Embroidery is a highly detailed form of decoration, but turning a detailed digital design into clean stitches requires careful planning. Embroidery Digitizing Services convert artwork into machine-readable embroidery files while deciding how every small element should be stitched. Fine details such as tiny lettering, thin lines, facial features, borders, textures, and small shapes can be difficult to reproduce because embroidery thread has physical limitations.
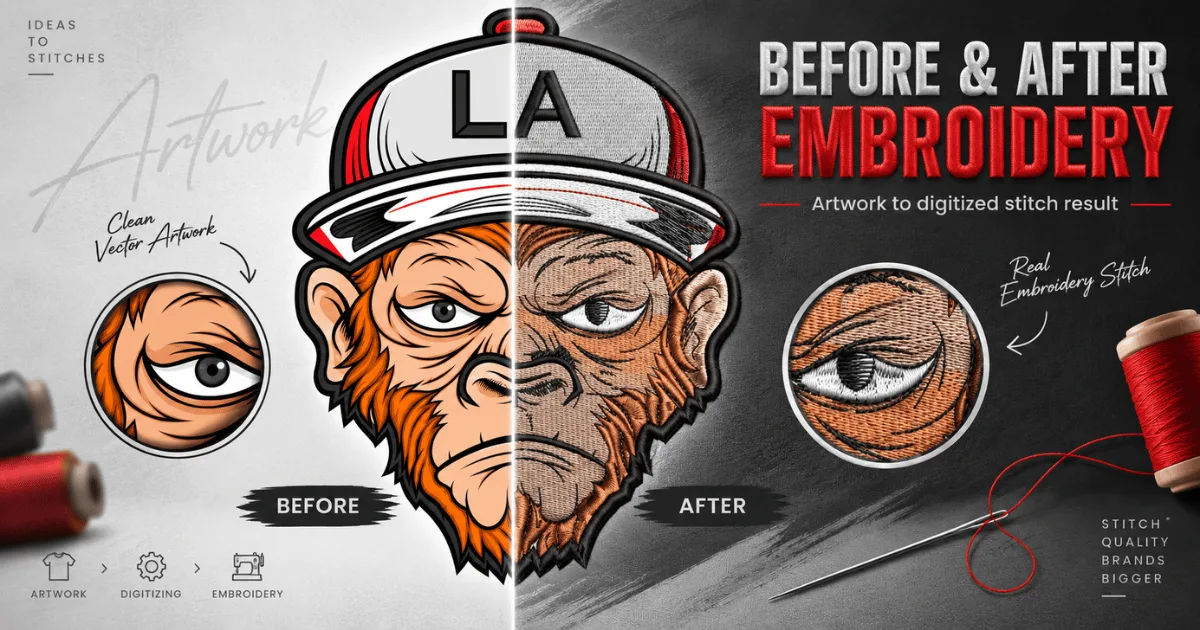
A design that looks perfect on a computer screen may not produce the same result when stitched onto fabric. Thread has thickness, fabric can stretch, and small stitches can become crowded. Professional digitizers understand these challenges and modify artwork when necessary without losing its main appearance.
The goal is not simply to copy every pixel. It is to create a stitch structure that accurately represents the important details while remaining practical for an embroidery machine.
Why Fine Details Are Difficult in Embroidery
Embroidery works differently from digital printing. A printer can reproduce extremely thin lines and tiny details because ink can be placed in very small areas. Thread, however, has a measurable thickness and occupies physical space.
When too many stitches are placed close together, they can overlap and create a bulky or messy area. Extremely short stitches may also fail to form properly or may pull through the fabric.
Professional Embroidery Digitizing Services therefore evaluate the artwork before creating the final stitch file. They determine which details can be reproduced exactly and which details need slight adjustments.
Thread Has Physical Limitations
Embroidery thread cannot create infinitely thin lines. A very narrow line may need to be slightly widened so that it remains visible after stitching.
The same principle applies to tiny shapes. If a shape is smaller than the practical stitching area, it may disappear or become difficult to recognize.
Digitizers compensate by adjusting stitch width, stitch direction, spacing, and density.
Fabric Changes the Final Appearance
The same design can look different on cotton, denim, jackets, caps, fleece, and stretchy garments. Some fabrics provide a stable surface, while others allow stitches to move or sink into the material.
Fine details are particularly sensitive to these differences. A tiny letter that looks sharp on a firm fabric may become less clear on a soft or stretchy garment.
This is why experienced Embroidery Digitizing Services consider the intended fabric and product instead of treating every design the same way.
How Digitizers Prepare Artwork for Fine Details
The digitizing process usually begins with artwork analysis. The digitizer studies the design and identifies its important visual components.
Instead of immediately converting the artwork into stitches, they determine the best way to construct each section.
Separating Design Elements
A detailed logo may contain several layers, including a background, borders, text, icons, and decorative elements. Digitizers separate these components into individual embroidery objects.
This allows each section to receive an appropriate stitch type.
For example, a large background area might use fill stitches, while a narrow border could use a satin stitch. Small text may require special lettering settings.
Simplifying Where Necessary
Professional digitizing does not always mean reproducing every tiny detail. Some details are too small to survive the embroidery process.
A skilled digitizer may simplify a small decorative mark, remove an unnecessary tiny line, or slightly enlarge a small shape.
This type of adjustment preserves the overall appearance while making the design more reliable when stitched.
The best Embroidery Digitizing Services know that controlled simplification can actually produce a more accurate final result.
Using Appropriate Stitch Types
Different stitch types are useful for different details. Choosing the correct stitch is one of the most important parts of detailed digitizing.
Satin Stitches for Narrow Lines and Borders
Satin stitches are commonly used for borders, lettering, outlines, and other narrow elements. They create a smooth, continuous appearance.
They are particularly useful when a design requires a clean edge or polished lettering.
However, satin stitches become difficult to manage when an area is extremely narrow. The digitizer may need to adjust the width or use another stitch technique.
Fill Stitches for Larger Areas
Fill stitches are used to cover larger sections of a design. They consist of rows of stitches arranged according to a selected pattern and direction.
For detailed artwork, fill stitch direction can help create visual separation between neighboring sections.
Changing stitch direction can also add dimension and prevent a large area from appearing flat.
Running Stitches for Fine Lines
Running stitches can be useful for thin outlines and delicate details. They use a relatively simple stitch path and can reproduce narrow visual elements without creating excessive bulk.
However, running stitches must be planned carefully. If a line is too small or contains too many changes in direction, the result may not look clean.
Managing Tiny Text
Small lettering is one of the biggest challenges in embroidery. Fonts that look readable at a large size may become difficult to recognize when reduced.
Digitizers must consider letter height, stroke width, spacing, and font construction.
Choosing Embroidery-Friendly Fonts
Some fonts have thick, simple letterforms that remain readable at smaller sizes. Others contain delicate strokes and complicated curves that do not translate well into thread.
A professional digitizer may recommend changing the font slightly when necessary.
The objective is to maintain the brand's visual identity while making the lettering suitable for embroidery.
Adjusting Letter Spacing
Letters that are too close together can merge when stitched. This is especially common with small text.
Digitizers adjust spacing to create enough separation between characters.
They may also modify individual letters when certain combinations create stitching problems.
This attention to spacing is an important reason businesses use professional Embroidery Digitizing Services for logos and uniforms.
Controlling Stitch Density
Stitch density refers to how closely stitches are placed within an embroidered area.
Higher density does not automatically mean better quality. Excessive density can make an area stiff, heavy, or difficult to stitch.
It can also cause thread buildup and increase the possibility of puckering.
Avoiding Overcrowded Details
When a design contains many tiny elements, the digitizer must balance detail against stitch density.
A small section may require fewer stitches than the artwork appears to suggest.
Instead of placing multiple overlapping stitches into a limited space, the digitizer can adjust the structure so the visual effect remains clear without excessive thread.
Preventing Gaps
The opposite problem can also occur. If stitch density is too low, unwanted fabric may show through the design.
Professionals adjust density according to the fabric, thread, stitch type, and design size.
This balance is especially important for detailed logos where small gaps can change the appearance of letters or symbols.
Using Underlay to Support Fine Details
Underlay stitches are placed beneath the visible stitches. They help stabilize fabric and create a better foundation for the main design.
A suitable underlay can prevent the top stitches from sinking into soft fabric.
It can also help maintain the shape of narrow elements and improve the overall definition of the embroidery.
However, too much underlay can increase bulk. Digitizers therefore choose the type and amount according to the material and design.
Managing Stitch Direction
Stitch direction can have a major effect on the appearance of detailed embroidery.
When neighboring sections use different stitch directions, the design can appear more structured and visually distinct.
Direction can also influence how light reflects from the thread.
For example, changing the direction of stitches in two adjacent areas can make their boundaries easier to see even when both areas use the same thread color.
Experienced Embroidery Digitizing Services use this technique to add definition without unnecessarily adding more colors.
Handling Curves and Small Shapes
Curves can be challenging because embroidery machines create designs through programmed stitch movements rather than drawing continuous digital lines.
The digitizer must plan stitch placement so curved edges remain smooth.
Maintaining Clean Edges
Small circles, curved borders, and rounded letters require careful stitch planning.
If stitches are placed poorly, curves can appear jagged or uneven.
Professional digitizers adjust stitch angles and object shapes to create smoother transitions.
Protecting Small Open Spaces
Some logos contain tiny holes or open spaces inside letters and symbols. These spaces can disappear when the surrounding stitches become too dense.
A digitizer may enlarge the opening slightly or change the surrounding stitch structure.
This preserves recognition while accounting for the physical properties of embroidery.
Why Design Size Matters
A detailed design cannot always be embroidered at every size.
When artwork is reduced, small features become proportionally smaller. Eventually, some details become too small for reliable stitching.
Professional Embroidery Digitizing Services often create different versions of a design for different applications.
For example, a large jacket-back design may contain more detail than a small left-chest logo.
A cap design may require even more simplification because caps have curved surfaces and limited stitching areas.
Digitizing for Caps and Other Difficult Products
Caps present special challenges because their surfaces are curved and their center seams can interfere with stitching.
Fine details near seams require careful planning.
Digitizers may change stitch sequences, adjust density, or simplify small elements to improve the final result.
Other difficult products include bags, thick jackets, fleece garments, towels, and stretch fabrics.
Each material requires its own approach.
A professional digitizer considers the final product before deciding how much detail should be included.
Using Stitch Sequence to Improve Detail
Stitch sequence determines the order in which different sections are embroidered.
A poor sequence can create unnecessary movement, thread buildup, distortion, or registration problems.
A well-planned sequence helps different elements align properly.
Reducing Unnecessary Movement
Digitizers organize objects so the machine can move efficiently between sections.
This can reduce unnecessary jumps and trims.
Fewer unnecessary movements can also help maintain a cleaner finished appearance.
Maintaining Registration
Registration refers to how accurately different parts of a design line up.
When small elements must meet precisely, proper sequencing becomes particularly important.
If fabric shifts during embroidery, tiny misalignments can become noticeable.
Professionals use appropriate sequencing and stabilization methods to reduce these problems.
Testing and Proofing Detailed Designs
A digital embroidery file should not automatically be considered finished simply because it works on a computer.
Testing is an important part of professional digitizing.
The design can be reviewed through software simulation, and when necessary, a physical sample can be stitched.
Reviewing the Digital Simulation
Embroidery software can provide useful information about stitch count, sequence, density, and potential problems.
A simulation can reveal areas where stitches overlap excessively or where small elements may not be practical.
However, software simulation cannot perfectly reproduce every physical characteristic of fabric and thread.
Creating a Physical Sample
A sample stitch-out provides the most useful evidence of how fine details will actually look.
The digitizer can inspect lettering, edges, density, thread tension, alignment, and overall appearance.
If something does not look right, the file can be adjusted and tested again.
This iterative process is a major part of high-quality Embroidery Digitizing Services.
How Thread Colors Affect Fine Details
Color selection can influence how clearly small details are perceived.
Two colors with similar visual values may blend together when stitched, even if they appear separate on a computer monitor.
Strong contrast generally makes fine details easier to recognize.
Digitizers may recommend small color adjustments when necessary.
They also consider how thread reflects light, because embroidery thread can have a different appearance from flat digital artwork.
Balancing Detail and Durability
Fine embroidery should not only look attractive when new. It should also remain stable through normal use and washing.
Overly delicate stitching can break or lose clarity over time.
Excessive stitch density can create another problem by making the garment stiff or causing stress on the fabric.
Professional digitizing aims to balance appearance, durability, and comfort.
This is particularly important for uniforms, workwear, sports clothing, and branded merchandise that may be washed frequently.
Common Mistakes in Detailed Embroidery Digitizing
Several mistakes can reduce the quality of fine embroidery.
One common problem is trying to preserve every tiny detail from the original artwork. Digital artwork may contain features that simply cannot be reproduced with thread at the selected size.
Another mistake is using excessive stitch density. More stitches do not necessarily produce more detail.
Poor stitch sequencing can also create registration problems and unnecessary thread changes.
Ignoring the fabric is another major issue. A design created for stable cotton may require adjustments when used on fleece, stretch fabric, or a cap.
Finally, failing to test the design can allow small problems to appear repeatedly in production.
How to Choose a Professional Digitizing Provider
When selecting Embroidery Digitizing Services, look beyond price.
Review examples of detailed work, especially logos containing small text, thin outlines, gradients, and complex shapes.
Ask whether the provider considers the garment type and embroidery size.
It is also useful to determine which file formats they provide and whether revisions are included.
A reliable provider should be willing to discuss practical limitations instead of simply promising that every detail can be reproduced exactly.
Good communication is particularly valuable when a design needs to be simplified.
Tips for Preparing Artwork
Clients can make the digitizing process easier by supplying clear artwork.
High-resolution logos, vector files, and clean original designs generally provide better references.
If the design will be embroidered at a specific size, that information should be provided before digitizing begins.
It is also helpful to explain where the design will be placed and what type of garment or product will be used.
For example, a logo intended for a cap should be treated differently from one intended for a large jacket back.
Providing these details allows Embroidery Digitizing Services to build the file around the actual production requirements.
The Role of Modern Digitizing Software
Modern embroidery software gives digitizers powerful tools for controlling individual stitch properties.
They can adjust stitch angles, densities, underlay settings, object shapes, pull compensation, and sequencing.
Software also makes it easier to inspect stitch paths and identify potential problems before production.
However, software alone does not guarantee professional results.
Human experience remains important because the digitizer must understand how digital settings translate into physical stitches.
The best results come from combining suitable software with practical embroidery knowledge.
Conclusion
Fine details are among the most demanding aspects of embroidery. Small lettering, thin lines, tiny openings, curved edges, and intricate shapes can easily lose clarity when converted from digital artwork into stitches.
Professional Embroidery Digitizing Services address these challenges by analyzing artwork, selecting suitable stitch types, controlling density, adjusting underlay, managing stitch direction, and considering the final fabric and product.
The process involves much more than pressing a button to convert an image into an embroidery file. A skilled digitizer makes informed decisions about what should be preserved, what should be simplified, and how every section should be constructed.
Design size is also critical. A detailed logo that works beautifully on a large jacket may need significant changes when reduced for a shirt chest or cap. Creating application-specific versions can therefore produce much better results than forcing one file to work everywhere.
Testing adds another layer of quality control. Digital previews are useful, but physical stitch-outs can reveal issues that are difficult to predict on a screen. Adjustments to density, sequencing, underlay, spacing, or stitch direction can make a significant difference in the final product.
Ultimately, successful detailed embroidery depends on balancing visual accuracy with the physical realities of thread and fabric. The objective is not to reproduce every tiny pixel but to create an embroidered design that looks clean, recognizable, durable, and professional.
When handled correctly, even complex artwork can be transformed into attractive embroidery. By combining thoughtful artwork preparation, technical digitizing skills, suitable stitch structures, and careful testing, Embroidery Digitizing Services can preserve the character of detailed designs while ensuring they perform well in real-world production.